How to Protect Outside Faucets from Freezing: Essential Tips
When the temperature drops, your outdoor faucets are at risk of freezing, which can lead to burst pipes, water damage, and expensive repairs. Knowing how to protect outside faucets from freezing is a crucial step in winter home maintenance. Whether you’re a seasoned homeowner or new to winterizing, our guide provides essential tips to safeguard your outdoor plumbing from freezing temperatures. Follow these simple yet effective steps to keep your faucets in working condition throughout the winter.
Why Is It Important to Protect Outside Faucets from Freezing?
Frozen outdoor faucets can create significant problems for homeowners. When water freezes, it expands, resulting in increased pressure inside your pipes. This can cause the pipes to crack or burst, leading to water leaks and potential damage to your property. Not only can this result in costly repairs, but it also poses the inconvenience of losing access to water.
By taking preventive measures, you not only save money but also ensure continuous access to water for your household. Winterizing your faucets reduces the risk of emergencies and helps in maintaining the longevity of your plumbing system. It’s important to complete these tasks before temperatures drop to prevent any chance of freezing.
Step-by-Step Guide: How to Protect Outside Faucets from Freezing
Step 1: Disconnect and Store Garden Hoses
Start by disconnecting any garden hoses from your outdoor faucets. Leaving hoses attached can trap water inside them, which can freeze and cause damage to your faucet and pipes. After disconnecting, ensure you drain all water from the hoses and store them in a dry place.
Step 2: Shut Off the Water Supply to Outdoor Faucets
Locate the shut-off valve for your outdoor faucets. This valve is typically found inside the house, near where the main water line enters. Turn off the valve to stop the water supply to the outdoor faucets. This step is crucial to prevent any remaining water in the pipes from freezing.
Step 3: Drain Residual Water from Faucets and Pipes
After shutting off the water supply, open your outdoor faucets to drain any residual water. Let the water completely drain out to prevent it from freezing inside the faucet or connected pipes. This will also relieve any pressure within the plumbing system.
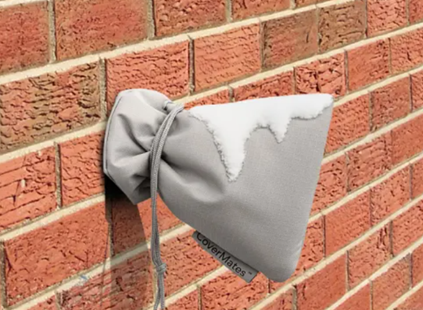
Step 4: Install Insulated Faucet Covers
Invest in insulated faucet covers, which are available at most hardware stores. These covers are designed to protect your faucets from freezing temperatures by providing an extra layer of insulation. Securely attach the covers to each outdoor faucet to keep the cold air out.
Step 5: Insulate Exposed Pipes Leading to Faucets
Exposed pipes leading to your outdoor faucets should be insulated to prevent freezing. Use foam pipe insulation, which is easy to install and cut to size. Wrap the insulation around the pipes and secure it with weatherproof tape to ensure complete coverage.
Step 6: Consider Installing Frost-Proof Faucets
For a long-term solution, consider replacing your standard outdoor faucets with frost-proof faucets. These faucets are designed to allow water to drain from the pipe when the faucet is turned off, preventing any leftover water from freezing. While this may require a bit of investment, it can save you from future hassles.

What Are the Best Tools and Materials to Prevent Freezing?
Recommended Faucet Covers and Pipe Insulation
Opt for faucet covers made of sturdy, insulating materials to provide the best protection against freezing. Weatherproof and durable, these covers shield your faucets from harsh winter elements. For pipes, foam insulation sleeves work best. They’re easy to install and provide excellent thermal resistance.
Using Heat Tape for Additional Protection
If you live in an area prone to severe cold, consider using heat tape along with insulation. Heat tape is an electric device wrapped around pipes to regulate their temperature. It’s particularly useful for ensuring that any remaining water in the plumbing doesn’t freeze.
When Should You Start Winterizing Outdoor Faucets?
Begin winterizing your outdoor faucets before the first significant temperature drop. Monitoring weather forecasts in your area can help you determine the best time to start. Ideally, complete all winterizing tasks in early fall to avoid last-minute rushes and ensure your faucets are well-protected before the cold sets in.
Conclusion
Protecting your outdoor faucets from freezing is a vital component of winter home maintenance. Knowing how to protect outside faucets from freezing can save you from costly repairs and unnecessary stress. By following these essential tips, you can prevent damage and ensure a smooth winter season for your plumbing. Stay proactive and safeguard your home from the discomforts and expenses associated with frozen pipes.
FAQ
Can I use outdoor faucets during winter after winterizing them?
After winterizing, it’s best to avoid using outdoor faucets to ensure their protection from freezing. If necessary, re-winterize the faucet following any use.
What should I do if my outdoor faucet is already frozen?
If you discover a frozen faucet, turn off the water supply and try thawing it with a hair dryer or a towel soaked in hot water. Avoid using open flame devices. Once thawed, check for any leaks or damage.
How often should I check my outdoor faucets during winter?
It’s a good practice to periodically check your outdoor faucets and pipes throughout winter, especially after extreme cold spells. This helps you catch any potential issues early and take preventive action.